

Plastic injection molding is highly effective at producing near-net-shape parts, but additional steps are often needed to achieve a part’s final requirements. Post-molding operations refer to any processes performed on a molded part after it’s ejected from the mold, in order to impart the final shape, features, or finish.
These secondary operations can enhance a part’s strength, dimensional accuracy, durability, and aesthetics beyond what the molding process alone can accomplish. Common post-molding steps range from simple trimming of excess plastic to sophisticated assembly and surface treatments.
Far from being extraneous, post-molding processes play a critical role in injection molding workflows. They allow manufacturers to simplify the molding stage—for example, by using a simpler mold design or shorter molding cycle — and then add complex features or precision later. In fact, many molds are intentionally built to avoid difficult features, like side holes or threads, and instead rely on secondary operations to add those details economically. Mold tool costs are reduced, multiple cavities can be added to the mold easily and economically, and part costs can actually decrease.
By thoughtfully integrating post-molding operations, teams can reduce upfront tooling complexity and costs while still meeting strict product specifications. The sections below explore key types of post-molding operations and how they can simplify production, cut costs, and improve quality in plastic injection molding.
Common Post-Molding Operation Techniques

Machining Operations (Trimming, Drilling, Milling, etc.)
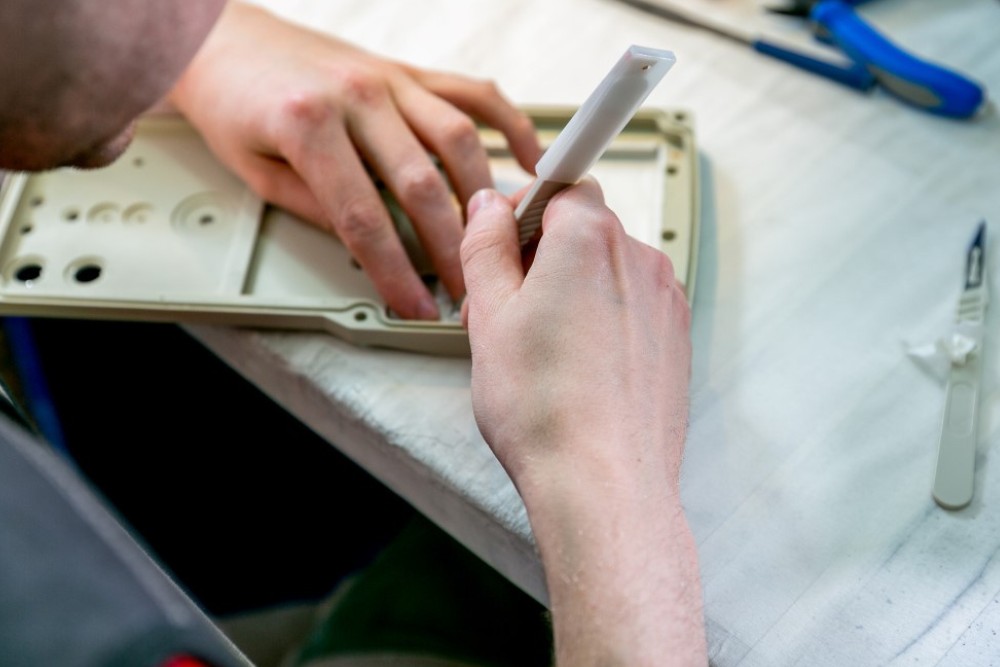
One of the most common post-molding steps is machining—the process of removing or shaping material on the molded part using cutting or abrasive tools. Machining operations are often used to trim away excess plastic (such as gate vestiges or flash) and to add precise features that are impractical to mold directly. For example, a molded part may require small drilled holes, tight-tolerance dimensions, or tapped threads that are best achieved with CNC machining after molding.
Rather than design an expensive mold with sliding cores or unscrewing mechanisms to create these features, it can be more efficient to mold a simpler part and perform secondary cutting operations. Studies show that incorporating complex moving cores in a mold can raise tooling costs by 15–20%, so eliminating those through minor post-mold machining can significantly reduce upfront costs.
Trimming, deburring, and de-gating are basic machining tasks done immediately after molding. Operators or automated cutters remove the runner, sprue, or any flash (thin excess material that seeped between mold halves) from the part. This ensures a smooth edge and proper fit. Custom de-gating tools or fixtures are sometimes employed.
Once excess material is removed, additional machining can be done to refine the part. Drilling or milling can create holes, slots, or other details that were not molded. CNC milling is also used to tighten critical tolerances or achieve surface flatness on sections that need high precision, which might be beyond the inherent capability of molding. In high-performance applications (like aerospace or medical devices), it’s common to mold parts slightly oversized and then machine critical surfaces to exact dimensions.
The benefit of post-mold machining is that it offloads difficult features to a flexible, precise process. Molders can stick to a straightforward mold design (often a simple straight-pull mold without side actions) and then use 3-axis or 5-axis CNC machines, drills, or taps to add intricacy. Modern CNC equipment makes this approach quite efficient—plastic is generally easier and faster to machine than metal, enabling high-speed, high-accuracy fabrication of features on molded parts.
The result is a part that meets all design criteria without requiring an overly complex mold or extended molding cycle. Of course, to use this strategy effectively, engineers must plan for machining in the design (for example, adding a machining allowance or flat locating areas on the part). When done right, post-molding machining yields parts with fine details and tight tolerances, while keeping the injection molding process itself as simple and cost-effective as possible.
Assembly Operations (Ultrasonic Welding, Fastening, Adhesive Bonding)
Many plastic products consist of multiple molded components that must be joined together. Post-molding assembly operations encompass the methods used to connect molded parts or attach additional hardware after the parts are produced. These operations are used to create finished products from individual pieces, and greatly simplify manufacturing by allowing complex products to be made in smaller, more cost-effective sub-components. Common assembly-related post-molding processes include mechanical fastening, adhesive bonding, and plastic welding.
Mechanical assembly uses physical hardware or part features to join pieces. This includes methods like screws, bolts, rivets, press-fits, and snap-fits. For example, many consumer products have small molded screw bosses so that screws can be used to fasten parts together after molding. Snap-fit designs are another popular approach—two halves of a plastic enclosure might be designed with interlocking clips that snap together, eliminating the need for separate fasteners.
Mechanical assembly is ideal when the product may need to be disassembled for maintenance or when joining dissimilar materials. It’s commonly seen in automotive and electronics products (e.g. using screws to attach a plastic housing). The downside is that hardware and assembly labor add cost, and fasteners can mar the product appearance or create potential leak paths. Thus, other bonding techniques are often preferred for sealed or high-volume assemblies.
Adhesive bonding involves gluing components together with an industrial adhesive. Many types of adhesives (epoxies, acrylics, cyanoacrylates, etc.) can create strong bonds between plastics or between plastic and metal. Adhesive joining is typically used when welding isn’t feasible—for instance, joining plastic to a different material or when the parts’ geometry doesn’t allow welding.
Adhesive can provide a permanent bond without visible hardware. However, adhesives introduce chemicals and cure times into the process, and the bond strength may be sensitive to environmental conditions. Adhesive assembly is thus chosen selectively, often for low-stress joints or when other methods can’t be applied. Design considerations include providing proper mating surface area and specialized surface treatments to ensure good adhesion.
Plastic welding is one of the most important assembly methods for thermoplastics. In welding processes, two plastic parts are melted at the interface and fused together, typically using heat, pressure, and sometimes motion. A major advantage of welding is that it creates a permanent, cohesive bond without any additional fasteners or glue, which simplifies the bill of materials and can lower production costs. There are several welding techniques used in post-molding assembly:
Ultrasonic Welding
High-frequency mechanical vibrations are used to locally melt and weld the interface of two plastic parts. Ultrasonic welding is extremely fast (often a weld is done in <1 second) and is widely used for joining plastic enclosures, toys, appliance parts, and more. It’s clean and precise—ultrasonics are even used in cleanroom assembly of medical and electronic devices where adhesives or solvents would be problematic. The welded joint strength can approach that of a single-piece molded part. This method is ideal for medium-sized parts made of compatible thermoplastics.
Hot Plate Welding
The parts are pressed against a heated platen to melt their mating surfaces, then brought together to bond. Hot plate welding is effective for large or complex-shaped parts and can produce very strong, hermetic seals. For example, automotive intake manifolds or fluid reservoirs are often joined by hot-plate or vibration welding. In fact, plastic welding is commonly used in automotive assemblies to join two halves of a component that would be difficult or costly to mold as one piece.
Heat Staking/Insert Welding
A process related to welding is heat staking, where a molded part has a small peg or boss that protrudes through a hole in a second part, and a heated tip is used to melt and mushroom the peg, staking the two parts together. This is often used to fasten plastic parts to metal components (e.g. staking a plastic assembly onto a PCB or chassis). Similarly, inserting metal components (like threaded inserts) can be done by heating and pressing them into a plastic part so that the plastic re-flows around the insert (often called ultrasonic inserting or heat pressing).
By using these assembly operations after molding, manufacturers can simplify a complex product by dividing it into simpler molded parts and then joining them, rather than trying to mold a single part that incorporates all features. For instance, instead of molding a complicated enclosure with internal features in one piece, which may not be possible using conventional injection molds, it can be molded as a top and bottom half and then ultrasonically welded together, thereby eliminating expensive side-actions and complicated tool geometry.
This approach simplifies molding and often yields a better overall result. The assembly method chosen will depend on the product’s requirements—ultrasonic welding is preferred for its speed and strength in mass production, whereas screws or snap-fits might be used for products that need serviceability. In many cases, assembly fixtures or even automation (robots or dedicated welding machines) are employed to ensure each post-mold assembly step is repeatable and efficient.
Post-molding assembly operations extend the capabilities of injection molding by enabling multi-part products. They allow for modular manufacturing (molding parts separately then assembling), which can shorten cycle times and use smaller machines. When planned correctly, these operations result in a final assembled product that meets all functional requirements, without over-complicating the molding process itself.
Surface Finishing Operations (Painting, Plating, Texturing, etc.)
After a part is molded, various finishing processes can be applied to improve its appearance, surface properties, or performance. These surface finishing post molding operations are often what turn a “plain” molded piece into a customer-ready product with the desired color, texture, and protection. Common post-molding finishing techniques include painting, coating, plating, printing, and texturing.
Painting and coating are widely used to enhance aesthetics or add surface protection. Plastic parts can be painted using techniques like spray painting or powder coating, either for cosmetic color or to apply functional coatings (e.g. a rubberized paint for grip, or a UV-resistant clear coat). Painting is often one of the cheapest ways to improve a product’s look or to add branding/logos.
For example, an appliance knob molded in a neutral plastic might be spray-painted chrome silver to match a stainless steel finish, or a company logo might be stenciled onto a molded enclosure. The type of paint or coating must be compatible with the plastic resin. Surface priming or treatment (like flame or plasma treatment) may need to be done beforehand to ensure good adhesion.
One advantage of painting is flexibility: the same molded part can be painted in different colors or finishes for variant products without changing the mold. Coatings can also impart properties like scratch resistance, matte or glossy texture, or even anti-microbial surfaces, depending on the application.
Plating and metallization involve adding a thin metal layer onto the plastic part. This is done either by electroplating, electroless plating, or vacuum metallizing. Plating can give plastic a shiny metal appearance (for instance, chrome-plated plastic trims on automobiles) or provide functional metal layers for EMI/RFI shielding and conductivity. For example, electronic enclosures for telecom or medical devices often require an interior conductive coating to block electromagnetic interference; this can be achieved by plating the plastic or coating it with a metal-loaded paint.
Companies specializing in plastic plating can apply chrome, nickel, copper, or gold plating to molded parts to achieve the desired effect. While plating adds cost and extra processing (and requires the plastic to be of a grade that can be plated, like ABS or PC/ABS blends), it effectively allows plastics to be used in applications demanding metal-like properties. According to industry experts, common approaches like hard chrome and electroless nickel plating are frequently used to give injection-molded parts a durable metal finish.
Beyond painting and plating, decorating and labeling operations are also typical post-mold steps:
Pad Printing & Screen Printing
These techniques apply painted or ink-based graphics onto the part’s surface. Pad printing uses a silicone pad to pick up ink from an etched plate and transfer it onto the part—ideal -for printing logos, icons, or text even on irregular surfaces. Screen printing uses a stencil and mesh to print, suitable for flat or gently curved surfaces and often used for multi-color graphics or larger logos.
These processes are invaluable for adding branding, instructional labels, or part identification to molded products. For instance, the graduated markings on a plastic syringe or the branding on a machine knob are likely applied via pad or screen printing after molding. They save the trouble of having to mold such markings into the part (which can be limiting and less legible.
Hot Stamping and Labeling
Hot stamping uses a heated die and foil to press a pigment or metallic foil onto the part, creating a permanent mark or decorative element (e.g., a gold metallic logo). Labeling could involve applying pre-printed labels or barcodes. These are common in consumer products and packaging components, where high-resolution text or intricate designs are needed that molding alone can’t produce.
Surface Texturing and Polishing
Sometimes, additional texturing is applied post-mold (though usually, textures are done in-mold). This could be media blasting, sanding, or chemical etching on the part surface if modifications are needed. More often, this refers to mold surface finishing (engraving a texture in the mold steel), which isn’t a post-mold operation on the part. However, if a part needs a different texture or a smoother finish than the mold provided, secondary finishing like sanding/polishing might be carried out. For example, to remove minor blemishes or smooth out a parting line, an operator might lightly sand and buff the area.
Surface finishing operations provide both cosmetic and functional benefits. They can dramatically improve product appearance—a painted or chrome-finished part simply looks more attractive and high-quality than raw plastic. Finishes can also hide minor molding defects; a textured paint can cover up knit lines or slight sink marks.
From a functional perspective, coatings can enhance performance: e.g., a PTFE (Teflon) coating can make a plastic component more wear-resistant or lower friction; a conformal coating can make it moisture-resistant; an EMI/RFI shielding coating on internal surfaces help the product meet electromagnetic compatibility requirements. All these value-added finishes mean the injection-molded part will meet its end-use requirements in appearance and behavior.
By performing painting, plating, or printing after molding, manufacturers keep the molding cycle focused on producing a solid base part, and then customize and perfect the surface later. This separation of tasks often simplifies mold design (no need to create multi-color parts in the mold or mold in logos) and gives more flexibility for last-minute changes (because a logo or color can be changed in the printing stage without cutting a new mold).
It’s worth noting that some finishing steps can be automated in-line—for instance, robotic spray painting stations can coat parts immediately as they come out of the molding machine, which integrates the secondary process into the production flow and saves time. Many injection molding suppliers, such as full-service molders, offer these secondary decorating services in-house. This means your parts can come out of the factory already painted, plated, and marked as needed, with no additional handling on your part.
Turn Your Design into Reality
Don’t let complex geometries or challenging requirements hold back your product development. Protoshop specializes in helping to navigate the decisions necessary to turn your most demanding designs into high-quality prototype parts with production-grade precision.
Whether you’re developing medical devices, intricate components, or innovative products, our 25+ years of experience ensures your prototypes meet exact specifications the first time. Reach out to our team today to learn more.